10 pro photo tips for amazing bird portraits with Canon cameras
Wildlife is certainly one of the more challenging genres photography has to offer. Often consisting of long waiting times in dark, damp and cold conditions waiting for the animal you’re stalking to appear, the perfect shaft of light to materialise and hoping your camera settings are spot-on when you finally go to press the shutter. However, there’s no greater feeling than when all of the elements eventually come together and you’re able to capture the exact moment[1] you were hoping for.
It takes bags of patience, revisiting locations frequently and strong camera knowledge too.
o To shoot stunning wildlife close-up shots of your own, check out the best lenses for bird photography[2]
Reader of PhotoPlus: The Canon Magazine[3], Rebecca Pitt, is currently studying photography at Leeds Art University in England and has a passion wildlife, often visiting wildlife parks and zoos to get in some practice with her Canon[4] EOS 1100D.
She’s written to us asking for help to improve her wildlife photography skills to get a better understanding of camera settings and how to get top animal shots out in the wild. We paired her up with wildlife pro Paul Fowlie at sunrise in the Yorkshire Dales for them to get some incredible portraits of moorland birds and more! Here’s some of the top tips Paul taught Rebecca on their workshop together.
 Paul FowliePro wildlife and macro photographer
Paul has been a pro wildlife and landscape photographer since 2010.
Based in Yorkshire, he runs photography workshops in the Lake District, the Yorkshire Dales, Scotland and Scandinavia, and is also the author of A Year with Nature: A Photographic Guide to Wildlife. We met up with him in Leyburn to drive around the wonderful Yorkshire Dales to see what wildlife we could find in and amongst the heather and rolling hills.
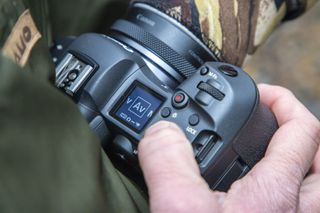
1. Aperture control
(Image credit: Future)[5]
Paul explained that he usually shoots in either his Canon’s Aperture priority or Manual modes so set up Rebecca’s EOS R6 in Aperture priority, also called Av on the mode dial.
This is a semi-automatic mode that allows you to adjust the aperture, a series of blades inside of the lens that let in more or less light (and also affect depth of field), as well as input the ISO to change how sensitive the sensor is to light. The camera then works out the correct shutter speed for you so that your attention can be spent composing and focusing.
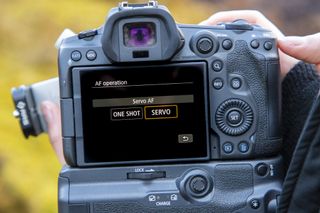
2. Autofocus setup
(Image credit: Future)
Canon’s latest generation of subject detection is astonishingly good and the Animal Subject Detection on Paul’s EOS R5[6] and Rebecca’s R6 works amazingly well.
Paul switched on Animal Subject Detection and also Servo autofocus which will continually autofocus and track a subject for as long as the shutter button is held down, great for ensuring your focus continually adjusts for any movement from fast and flighty subjects like birds.
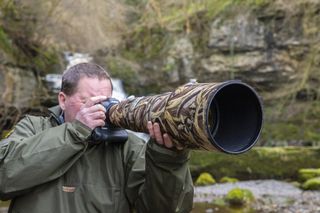
3. Full-frame mirrorless Canon EOS camera
(Image credit: Future)
Paul shoots on a Canon EOS R5 while Rebecca shoots on an EOS 1100D, however we were able to get hold of an EOS R6 for her to test out on the day. Both the EOS R5 and R6 use the new full-frame mirrorless RF mount and have blistering maximum frame rates of up to 40fps, they also boast incredible Animal Eye Detection autofocus.
The big distinction between the two camera bodies is the sensor resolution, with the EOS R5 being 45MP and the EOS R6 being 21MP.
4. Get down low

(Image credit: Future)
One of the easiest and cheapest ways too improve your wildlife photography is to get eye-level with your subject to push the background further away and make it easier to blur with a shallow depth of field.
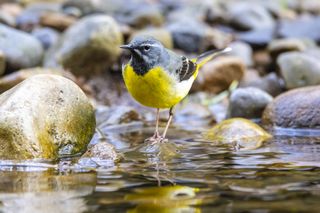
Grey wagtail (Image credit: Rebecca Pitt)
For small animals, like this colourful grey wagtail, get down on one knee but for moorland birds, it means lying prone on the ground, so it’s worth wearing waterproof clothes, or even lying down on a bin liner so you don’t get too muddy.
5. Lens hood
(Image credit: Future)
Paul always recommends attaching the lens hood to your Canon lenses.
Not only does a lens hood give you a bit of shade for better contrast in images and helps keep water off the front of the lens on rainy days like we were shooting in, they also offer a bit of protection against knocks and dings should you accidentally drop or prang your camera. It’s much more cost effective to replace the cheap lens hood than the glass front element of your expensive Canon lenses!
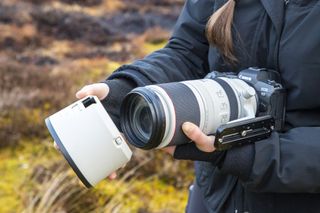
6. Long zoom lens
(Image credit: Future)[7]
Paul uses a variety of zoom lenses for his wildlife work and what he uses will depend on what he’s shooting.
For larger animals he might choose a RF 70-200mm f/2.8L[8] which has great image quality and a wide maximum aperture which makes the lens fast and able to blur the background.
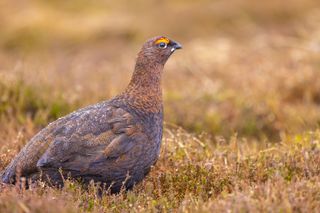
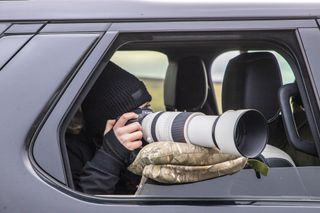
(Image credit: Rebecca Pitt)
However, for small birds a lens such as his RF 100-500mm is more suitable to get frame-filling shots of these tiny and agile subjects. Shooting from the car with a beanbag on the window, Rebecca was able to zoom in on this male grouse with her Canon RF 100-500mm F4.5-7.1L IS USM[9] to capture this lovely bird portrait and catch the stunning details of the water drops on its back.
7. High speed action shots

(Image credit: Paul Fowlie)
Paul uses a fast burst mode to capture the perfect moment, as well as Servo autofocus mode which will continually track focus when you half-press the shutter button.
Paul set Rebecca’s EOS R6[10] on Drive Mode to High Speed Continuous+.
8. Canon EF-EOS R mount adapter
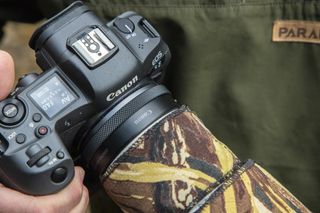
(Image credit: Future)[11]
Paul has recently switched from his old Canon EOS-1D X Mk II[12] to the full-frame mirrorless EOS R5. He’s still in the process of migrating his lenses over so uses the EF-EOS R to make his old Canon EF mount lenses for DSLRs fit his new RF mount mirrorless EOS R5.
His EF-EOS R mount adapter[13] also has a control ring[14] on it allowing him to quickly change core settings when he’s out in the field and speed is of the essence.
9. Stabilization modes
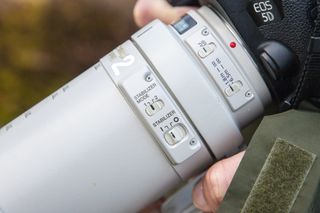
(Image credit: Future)
When shooting handheld Paul always has his Image Stabilisation switched on. This is a combination of optical stabilisation on his lenses, and In-Body Image Stabilisation (IBIS) where the sensor moves to combat camera-shake; the two methods combined help mitigate shake even further and produce sharp shots at slower shutter speeds.
Paul mostly uses Stabilizer Mode 1 on his lens which corrects for shake on both the vertical and horizontal axis, although occasionally he’ll switch to Mode 2 for panning, where it only corrects for vertical movement so you can still achieve smooth panning shots.
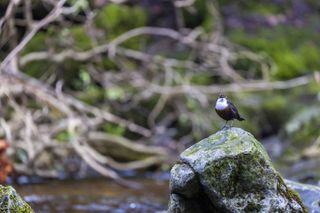
10. Watch the background
(Image credit: Paul Fowlie)
An often overlooked part of wildlife photography is the background. It’s all too easy to get fixated on the animals, trying to make sure they’re sharp and capturing the right moment, but your background makes a huge difference too.
These images were taken quickly back to back and at the same aperture of f/5.6 to blur the background.
While the background has been blurred, we can still see the scrappy tree branches in the background (above).
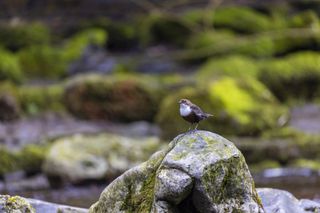
(Image credit: Paul Fowlie)
Moving slightly to recompose with the colorful mossy green rocks in the background helps smooth out the background and add color at the same time.
If you’re really into wildlife photography, you’ll want to check out the best wildlife lenses.
Paul uses a Canon EOS R5.
To see his stunning portfolio check out his Instagram, or to book a workshop visit his website.[15][16][17][18]
References
- ^ moment (www.digitalcameraworld.com)
- ^ best lenses for bird photography (www.digitalcameraworld.com)
- ^ PhotoPlus: The Canon Magazine (www.awin1.com)
- ^ Canon (www.digitalcameraworld.com)
- ^ (Image credit: Future) (www.digitalcameraworld.com)
- ^ EOS R5 (www.digitalcameraworld.com)
- ^ (Image credit: Future) (www.digitalcameraworld.com)
- ^ RF 70-200mm f/2.8L (www.digitalcameraworld.com)
- ^ Canon RF 100-500mm F4.5-7.1L IS USM (www.digitalcameraworld.com)
- ^ EOS R6 (www.digitalcameraworld.com)
- ^ (Image credit: Future) (www.digitalcameraworld.com)
- ^ Canon EOS-1D X Mk II (www.digitalcameraworld.com)
- ^ EF-EOS R mount adapter (www.digitalcameraworld.com)
- ^ ring (www.digitalcameraworld.com)
- ^ best wildlife lenses (www.digitalcameraworld.com)
- ^ Canon EOS R5 (www.digitalcameraworld.com)
- ^ Instagram (www.instagram.com)
- ^ website (www.paulfowliephotography.co.uk)